Interaction of Science and Art through Educational System
Ryuji TAKAKI
Gakuen-Nishimachi,
Nishi-ku,
Fax:+81-78-796-2559
takaki-r@kobe-du.ac.jp
Abstract: A new education system for students of art and design
is proposed, which has been applied in the course "Introduction to the
Theory of Design" at
Keywords:
science, art, design, educational system, natural phenomena, geometrical
structures
1.
Introduction
The present author has been engaged in
managing the course "Introduction to the Theory of Design"
since 2004 at
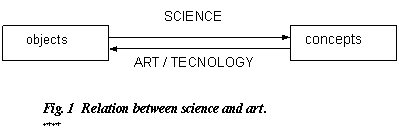
The Science is an activity to construct concepts and natural laws from real objects and real phenomena. On the other hand, the art is an activity to create real objects based on the concepts and desires in the brains of artists. The technology is similar to the art since it has the same orientation as that of the art, i.e. from concepts to production of real objects (machines, materials, etc). This relation between science and art/technology is illustrated as a diagram shown in Fig. 1. They are different only in orientations between objects and concepts.
In this course students have experiences of both of these orientations; one is a lecture including exercises of geometrical structures and experiments of natural phenomena and another is a creative work. When a creative work takes too much time to be finished within the class, it is left for homework.
In this course fourteen topics are prepared, which are classified into five categories arranged to a hierarchy as shown in Fig. 1 along with corresponding topics. The two topics, ratio and spiral, are combined with a key concept of “golden ratio”.
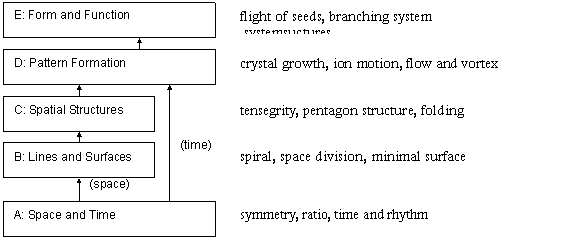
Fig. 2 Hierarchy of categories and topics
of the workshops.
As shown in Fig. 2,
the lowest level is the basic concepts to understand the nature and geometrical
structures. The next lowest level is concerned to basic shapes made of lines
and surfaces. Above this level come the spatial structures as combinations of
basic shapes. The next higher level is understanding
of natural phenomena through experiments, which appear often as temporal
developments. Finally, at the highest level students consider about a problem,
how functions of objects are linked to their shapes. Important factors in the
choice of topics are that they should attract students' interests and that
exercises and experiments can be prepared without difficulty.
Of course, choice of topics may depend on
teacher’s career and interest, and may change after a few years. In fact, a new
topic “Structural color and polarized light” is being prepared now.
The results of this course is reported as
publications within the author's university (Takaki, 2004, 2005, 2006), which will be sent
to those who are interested in this activity.
In the next section brief explanations of
some topics are given along with students’ works. In section 3 this author’s
comment is given on how interaction of science and art will be attained through
this educational activity.
2. Explanations of
Some Topics
2.1 Symmetry and
Kaleidoscope
There are a variety of ways to become
familiar to the concept of symmetry. One of them
is to play with mirror images, and the kaleidoscope
provides us a good experience. The purpose of this topic is to understand how
mirror images are produced and how this mechanism is applied to the
kaleidoscope.
Students learn first about the images
produced in two mirrors intersecting with angles of 60, 72, 90, 120 degrees.
The cases of 90 and 120 degrees are shown in Fig. 3(a)
and (b), respectively. In the case of 90 degree
they learn that the "image 3" in the figure is produced through twice
reflections, and that it can be looked upon as a secondary mirror image of the
"image 1" or that of the "image 2". These secondary images coincide each other and no inconsistency occurs in mirror
images. At this stage students have an exercise to draw images in the case of
the intersection angle of 60 degree, which allow consistent images also.
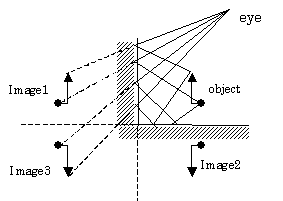
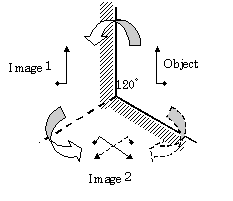
Fig. 3 Images due to two intersecting
mirrors. (a) Case of angle of 90 degree, where "image 3" is a
secondary image of "image 1" and also that of "image 2".
(b) Case of 120 degree, the secondary image
of "image 1" does not coincide with "image 2".
On the other hand, in the case of 120 degree,
the secondary image of "image 1" does not coincide with the
"image 2". As a result, if we try to observe the image 2, we see
different images (direct image of the object or the secondary image of
"image 1") according to the positions of eyes. This inconsistent
situation is met also in the case of 72 degree, which can be confirmed by an
exercise of drawing images. This kind of inconsistency occurs when the
intersection angle of two mirrors is a division of 360 degree by odd numbers.
After these exercises students make a simple mirror
system by connecting two mirrors at their edges by the use of adhesive tape.
With this system they can confirm what they have learned through lecture and
exercise. By the way they have an exercise to draw images for the conventional
kaleidoscope of triangular tube. Through these exercises students will be
convinced that a combination of angles, which are divisions of 360 degree by
even numbers, allows a proper design of kaleidoscope.
Next, students challenge to build up so
called "polyhedral kaleidoscope", which is made of a conical
configuration of three mirror. In order to have a
basic understanding of this kaleidoscope, an idea of geodesic polyhedra is introduced, which are produced through the
following processes:
1) Let a sphere
contact from outside to one of regular polyhedra.
2) Put a light
source at the center of the sphere and project all edges of the regular polyhedra onto the sphere.
3) Extend all
projected edges to great circles.
Then, we have a
division of spherical surface into equal spherical triangles, which is called
geodesic polyhedra. There are four types of geodesic polyhedra as shown in Fig. 4,
where geodesic 48-hedron is produced from a superposition of octahedron and
cubic. Students are suggested to build these geodesic polyhedra
by the use of styrofoam
sphere and rubber bands, as shown in Fig. 5.
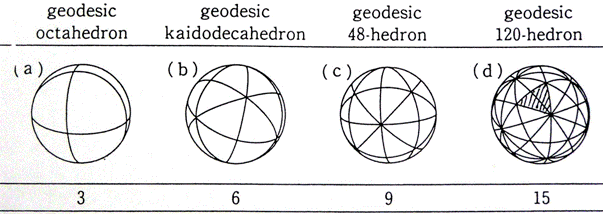
Fig. 4 Geodesic polyhedra
and numbers of great circles producing them
(reproduced from
"Encyclopedia of Forms", (Takaki, 2003)).
The hatched
section is used for "Pentakis"
by C. Schwabe.
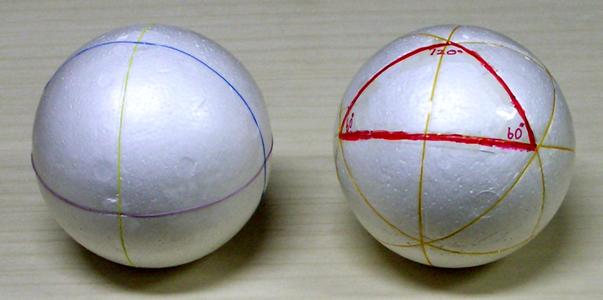
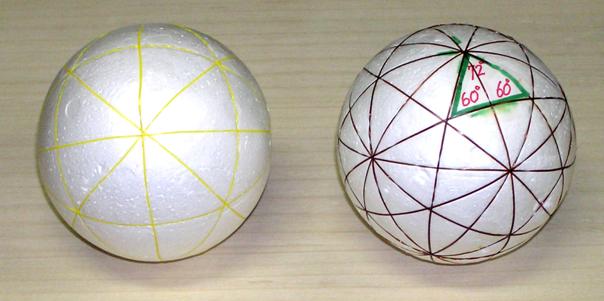
Fig. 5 Models of geodesic polyhedra.
(a) through (d) correspond to
the figures in Fig. 4 in this order. One
section of these polyhedra or
a combination of two sections constitutes a
conical mirror system
for polyhedral kaleidoscope.
One triangle section of a geodesic polyhedron
and the center of sphere constitutes a triangular
cone. If this cone is made of mirror plates with mirror surface directed inside
and an object is inserted in this cone, it shows an
interesting optical effects and produces a finite group of images. This
mirror combination is called "polyhedral kaleidoscope". However, in
order to prepare three triangular mirror plates for constructing this
kaleidoscope, we must know the vertex angles of these plates which gather at
the vertex of the cone. These angles are given in Table
1.
Table 1. Angles concerned to three triangular plates
for constructing
polyhedral kaleidoscope.
![]()
![]() geodesic polyhedra angles between side faces vertex angles of side
faces
geodesic polyhedra angles between side faces vertex angles of side
faces
geodesic octahedron 90 90 90 90 90 90
geodesic 24-hedron 90 60 60 70.5 54.75 54.75
geodesic 48-hedron 90 60 45 54.75 45 35.25
geodesic 120-hedron 90 60 36 37.4 31.7 20.9
![]()
The simplest polyhedral kaleidoscope is made
from a section of geodesic octahedron. It is made of three mirrors
perpendicular to each other. Students constructed kaleidoscopes of this type by
inserting objects as they liked, which are shown in Fig.
6. Another type of kaleidoscope produced in this course was that based
on the combination of two sections in geodesic 120-hedron (hatched section in Fig. 4. This kaleidoscope has intersection angles of
60, 60 and 72 degrees, and is named "Pentakis"
by Caspar Schwabe who
created it (Schwabe
& Ishiguro, 2006). He was invited to make a
workshop of kaleidoscope for this course. Artworks of Pentakis
by students are shown in Fig. 7.
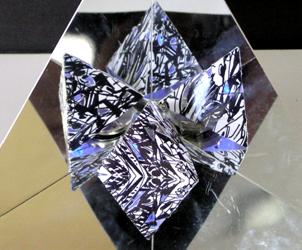
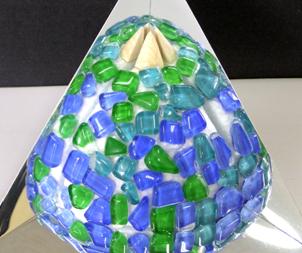
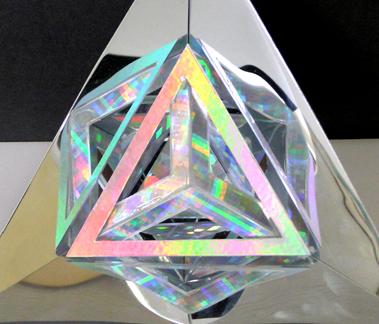
Fig. 6 Octahedral kaleidoscopes created by
(a) T. Shiozaki,
(b) R. Fazam, (c) A. Imazu, (d) H. Matsui.
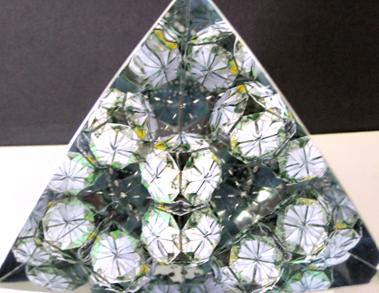
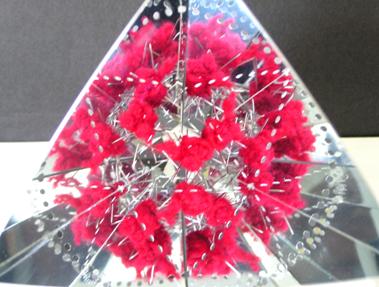
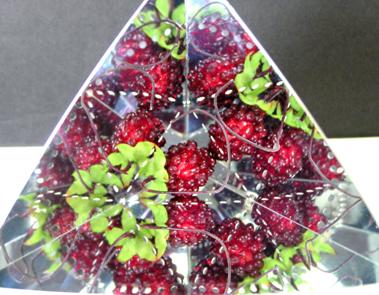
Fig. 7 Pentakis
created by (a) S.-R. Kim, (b) K. Torakuma,
(c) Y. Ezaki under the guidance of Prof. C. Schwabe.
The third type of
kaleidoscope applied in this course is based on the combination of two sections
of the geodesic 24-hedron, which is shown by a triangle with thick edges in Fig. 5(b). This kaleidoscope has intersection angles
of 60, 60 and 120 degrees. The three mirror plates for this kaleidoscope are
easily prepared. Cut along two diagonals of a rectangular plate with edge ratio
1 : √2 into four
triangles, connect two larger triangles to form a rhombus. The larger angle of
the rhombus is 109.5 degree, i.e. the Maraldi's angle,
which is the double of 54.75 degree appearing in the Table 1. Artworks of this
kaleidoscope (this author has not found a good name for this kaleidoscope)
created by students are shown in Fig. 8.
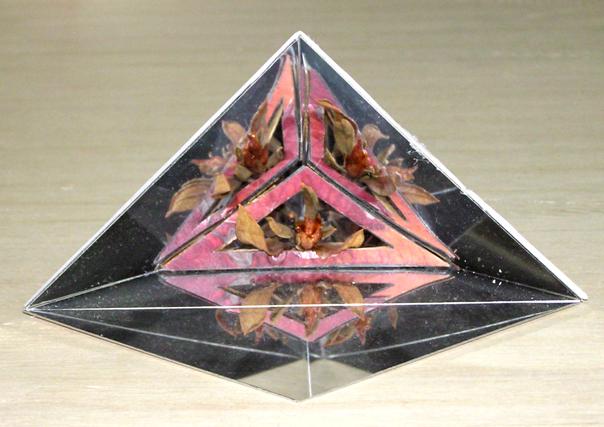
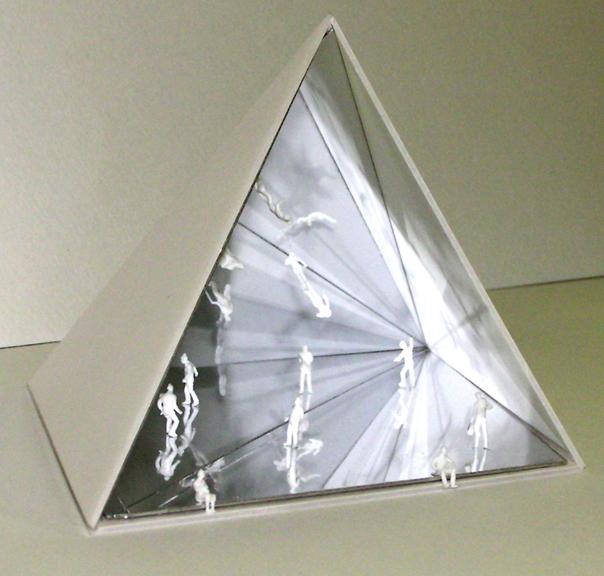
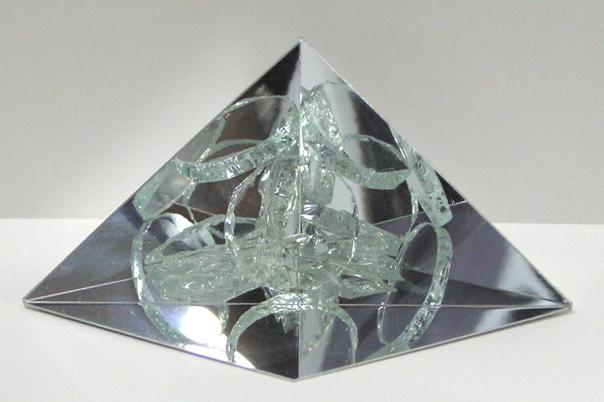
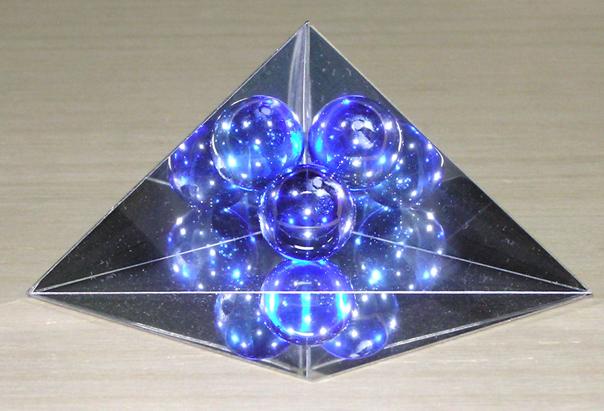
Fig. 8 Kaleidoscopes based on the geodesic
24-hedron
by (a) D. McDermott, (b) H. Nishiyama (another plate is added),
(c) H. Yasumori,
(d) M. Liu.
2.2 Space Division
In this topic after general introductions of
periodic tiling by polygons and random tiling based on the Collins lattice
(arrangement of squares and regular triangles) a workshop of a quasi-crystal
tiling is made.
The concept of quasi-crystal
is explained first by the use of a 1D model, i.e. a sequence of characters
"L" and "S" with deterministic growth rules: S→L and L→SL. According to this rule the growth of sequence is obtained
deterministically, as follows.
S → L → SL → LSL → SLLSL → LSLSLLSL → SLLSLLSLSLLSL → ∙∙∙
This sequence itself
acts as a motivation of creation. Examples of students' works are shown in Fig. 9.

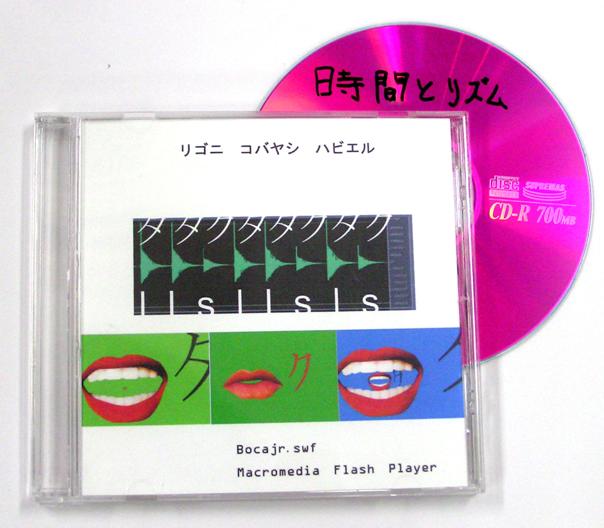
Fig. 9 Students' artworks based on the
quasi-crystal sequence, by
(a) Q.-N. Chang, (b) J. V. Rigoni-Kobayashi (sound based on the quasi-
crystal rhythm).
As a workshop of quasi-crystal tiling the Penrose tiling by the use of two kinds of rhombi is
applied. Small pieces of rhombi, as shown in Fig.
10(a), are given to students.
These rhombi have signs of arrows on their edges, and these signs must
be matched in tiling. Students make a decagon with a flower pattern (Fig. 10(b)), then they are suggested to extend it to
a tandem shape while respecting the tiling rule, i.e. arrow signs should be
matched (Fig. 9(c)).


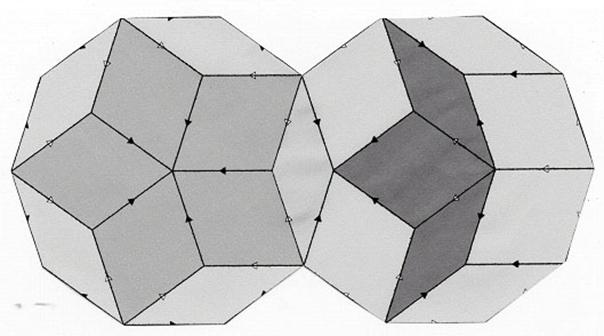
Fig. 10 Workshop of Penrose tiling. (a) Two
kinds of rhombi for tiling,
(b) the first
exercise to make a decagon, (c) the second exercise to extend
the decagon to a tandem of decagons.
This way of tiling can be continued to a
larger pattern, but it takes much time. Therefore, a workshop to construct a
large size pattern is made by the use of two kinds of decagons corresponding to
each of tandem shown in Fig, 10(c). Arrangement
of these decagons while allowing overlapping leads to the Penrose tiling. A
scene in the class is shown in Fig. 11(a), and
a result of tiling is shown in Fig. 11(b).
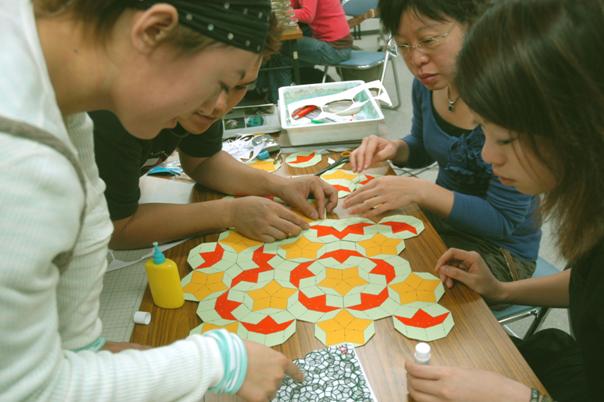
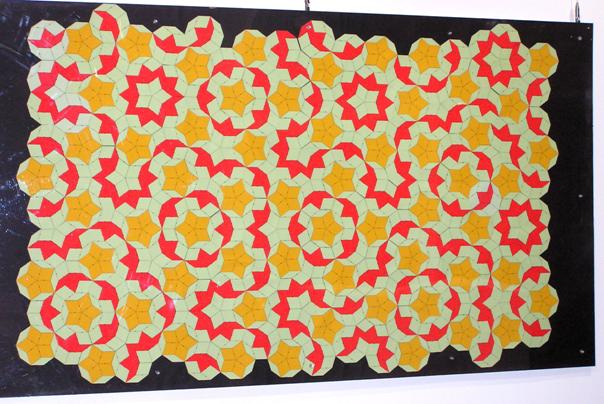
Fig.11 Workshop of Penrose tiling, (a) a scene in the
class,
(b) a
completed tiling for exhibition by Y.-P. Ren and W.-J. Li.
There are variety of problems for packing of 3D space by polyhedra. In the class only those by the rhombic dodecahedron and by the Kelvin's body (truncated octahedron) are treated,
because they are relatively simple body for space packing. Especially, the
former is related to the honeycomb structure, and the latter is considered to
be a body, many congruent bodies of which fill the space with the least
interfacial area. Recently, Weaire
(1996) and Weaire
& Phelan (1994) found another type of
packing with less interfacial area, where eight polyhedra
of equal volume (not congruent) constitute a unit of packing. However, this
story is too difficult for workshop, and it is noted only that this packing is
applied to the design of a building for Olympic 2008 in
As for the rhombic dodecahedron students make an experiment to produce this body by pressing closely packed spheres of paper clay. This process is shown in Fig. 12. After this experiment students take out the central clay and measure the angle of the rhombus on the dodecahedron. If the experiment is made carefully (clay spheres should be pressed with equal pressure from all sides), the Maraldi's angle 109.5 degree will be confirmed, which was found within the honeycomb in 17c. by Maraldi.
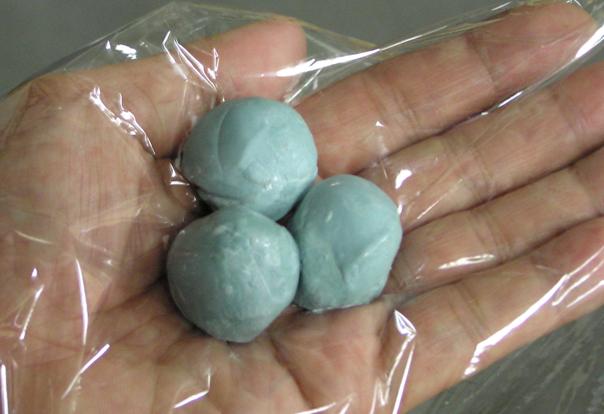
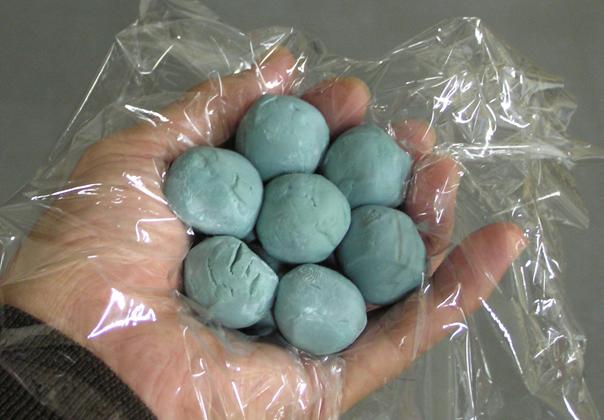
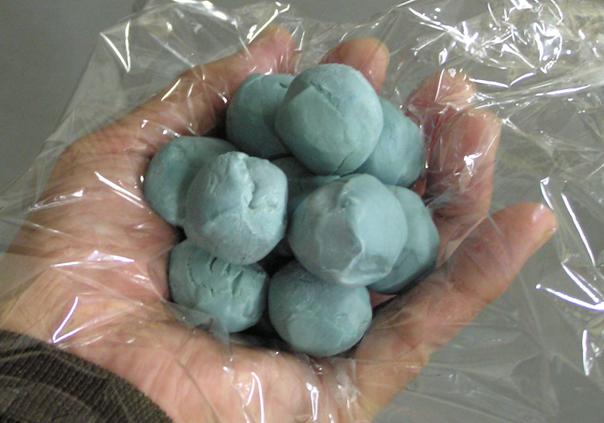
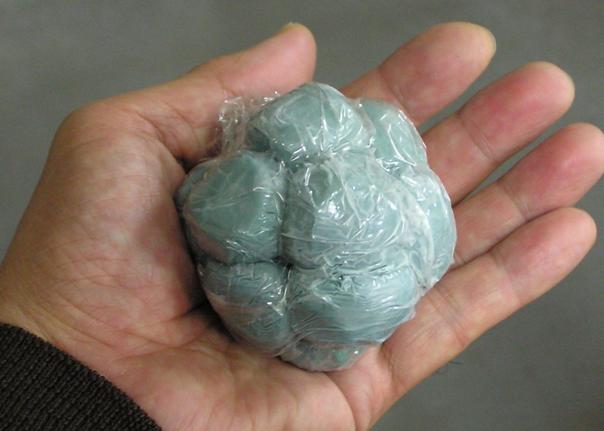
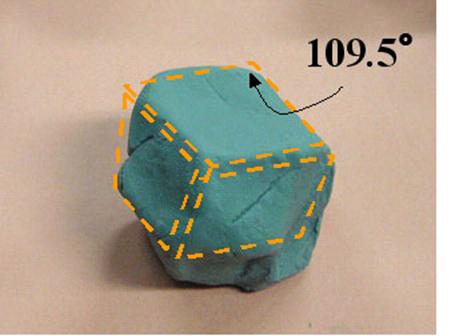
Fig. 12 An experiment to produce a rhombic
dodecahedron. From (a)
through (d):
make a close packing of equal clay sphere on the palm and
press it,
(e) measure the angle of rhombus to confirm the Maraldi's
angle.
As for the Kelvin's body, students make many of it by paper and confirm that these bodies fill the space without gap (Fig. 13). They convince themselves of the small interfacial area from the fact that this shape is near to that of sphere. Students' artworks inspired by these workshops are shown in Fig. 14.
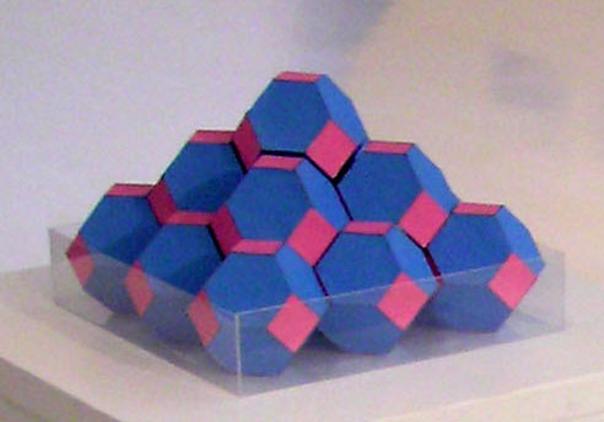
Fig. 13 Packing of Kelvin's body made of
paper.

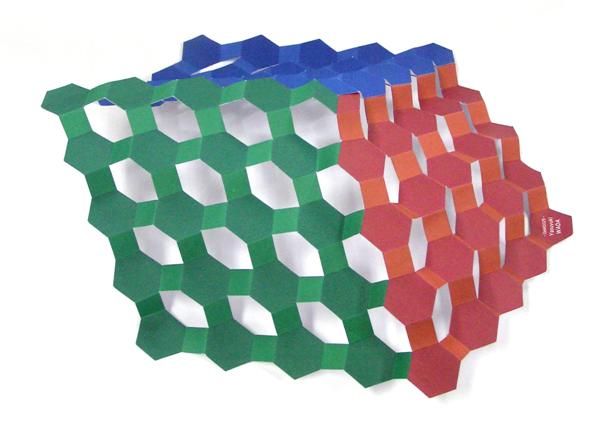
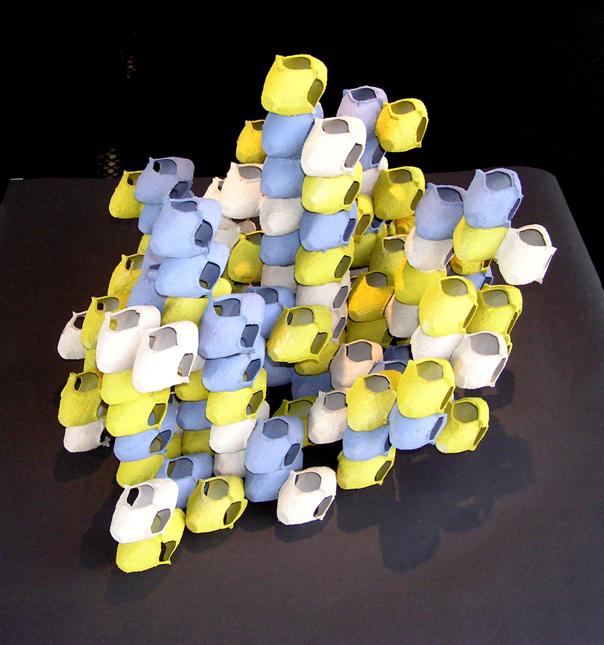
Fig. 14 Students' artwork inspired by the
workshops of space division.
(a) Application of honeycomb structure by R.
Kinoshita, (b) paper craft
imitating the packing of Kelvin's bodies by Y. Wada
(he got a hint in a book
of Londenberg
(1972)), (c) construction of egg cases, which is similar to the
the packing of Kelvin's bodies, by R.S. Techiera Rodrigues and P. Luo.
2.3 Growth Forms
Growth form
is a form of an object which appears when the object is growing under an inequilibrium condition. Typical examples of growth forms
are the snow crystal and the aggregation of ions in a solution. Opposite
concept of the growth form is the equilibrium form, which appears in a
mechanical or a thermal equilibrium condition, its typical example being the
forms of soap film and the catenary.
Some growth forms, as given above as
examples, have attractive dendrite shapes and
are suitable for topics of workshop. In this course an experiment of aggregation of silver ions and a simulation of
growth of snow crystal are made. Through these experiences students are
expected to acquire a basic idea of how objects are formed in the nature.
The experiment of the ion aggregation is
made in the following process.
1) Put a piece of
filter paper or similar material in a small flat container and place a cupper
wire of diameter 0.5〜1 mm on the paper, where the wire can be deformed arbitrarily.
2) Add a small
amount of an aqueous solution of AgNO3 (concentration of ca. 0.1
mol).
3) Put a cover on
the container so that the paper does not dry, and keep watching. The growth of
an aggregate can be observed better by the use of a magnifier lens.
An example of experimental results is shown
in Fig. 15. A fine branching structure is seen
to grow from the cupper wire. This reaction is caused by the larger ionization
tendency of the cupper than that of silver, so that cupper become ions and is
solved into the water while the silver ions become metal silver. The cupper
ions often produce the stain, which cover the metal silver. This reaction is
affected by the property of paper and the pollution of water.
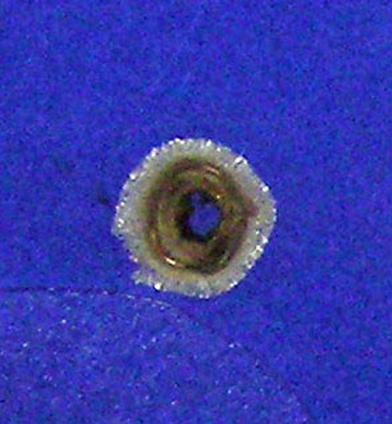
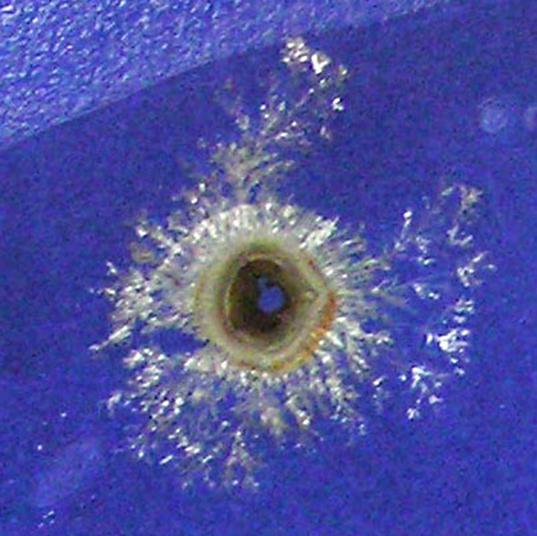
Fig. 15 Aggregation of silver ions growing
from the cupper wire, after
(a) 10 min. and (b) 250 min. The diameter of the cupper ring was 15 mm.
The mechanism of formation of dendrite shape
is understood in terms of diffusion-limited aggregation.
When silver ions are transported by diffusion from far part of solution to the
aggregate from, the rate of transport is larger to the tips of aggregate, hence the branching is automatically accelerated.
Patterns of this silver aggregation are beautiful enough to be applied to art
creation. Two artworks are shown in Fig. 16,
which were created for exhibition after the workshop.
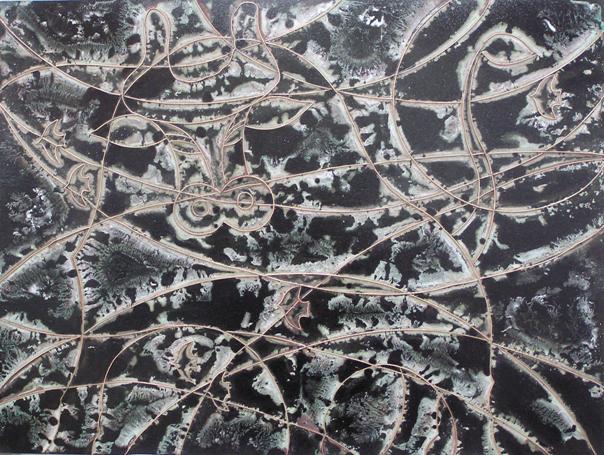
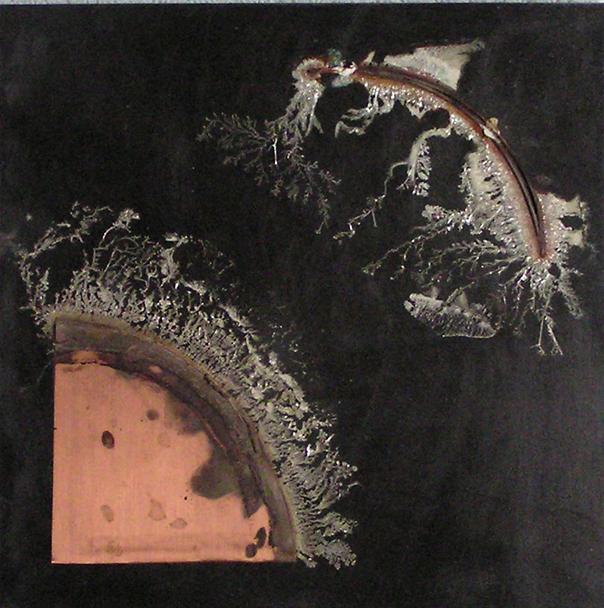
Fig. 16 Artworks created by applying
aggregation of silver ions by
(a) By J. Xu,
D.-B.
University) (b) R. Takaki.
The snow crystal
is produced in the atmosphere with temperature lower than 0 degree Celsius and
with over-saturation condition. The growth mode of crystal has been
investigated by Nakaya
(1951, 1954) and Kobayashi (1961). According to
their results crystals have various shapes according to these atmospheric
conditions. In particular, in the temperature region –10〜–20 degree the crystal has a shape of thin
hexagonal plate, and the degree of over-saturation gives a further modification
so that the crystal takes a shape of simple hexagonal plate in the lower
over-saturation (Fig. 17(a)) while it takes a
complicated dendrite shape in the higher over-saturation (Fig. 17(b)). In the other temperature regions, the
crystal shapes are either needle, hexagonal column or a hexagonal cup (Fig. 17(c)).

Fig. 17 Typical shapes of snow crystal
(sketches by R. Takaki after
the photos in the book of Kuroda (1984). (a)
Hexagonal plate,
(b) dendrite plate,
(c) needle and hexagonal column.
In the class of this course, after students
have learned a basic idea of snow crystal formation, they let a snow crystal
grow by a manual simulation, i.e. by the use of a pencil and a die. The die is
necessary to simulate a situation that a snow flake experiences various
atmospheric conditions randomly while it falls down. In the simulation students
use a section paper, whose axes intersect with angles 60 degree and whose total
shape is a wedge with vertex angle 30 degree (see Fig.
18).
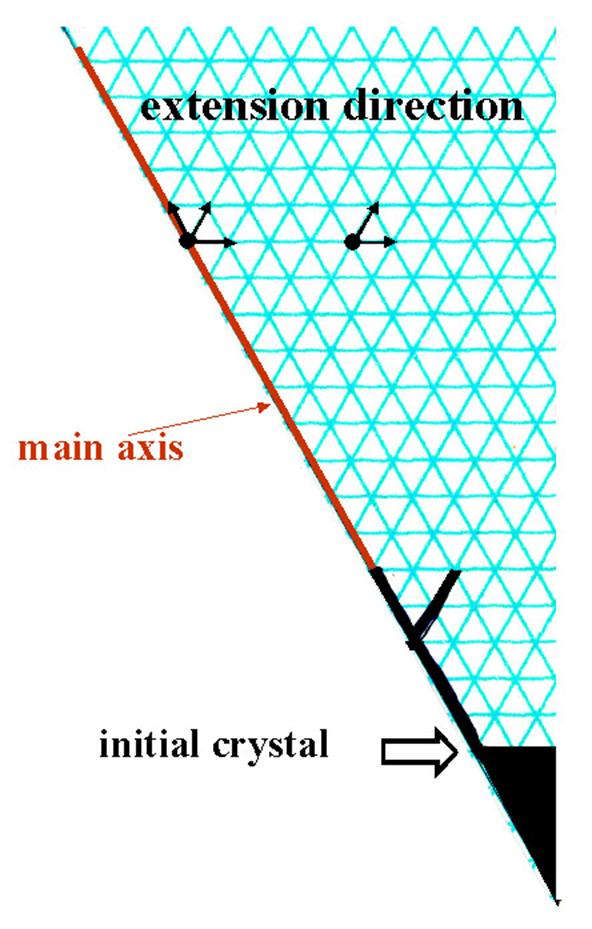
Fig. 18 Section paper for
simulation of snow crystal growth. After the simulation is over, its photocopies
and their inverted copies are gathered to from
a snow crystal of six-fold symmetry.
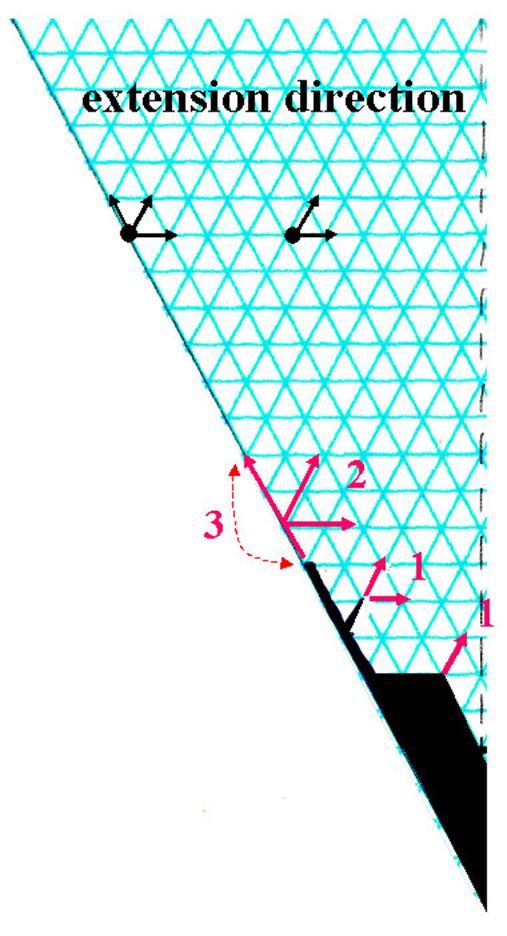
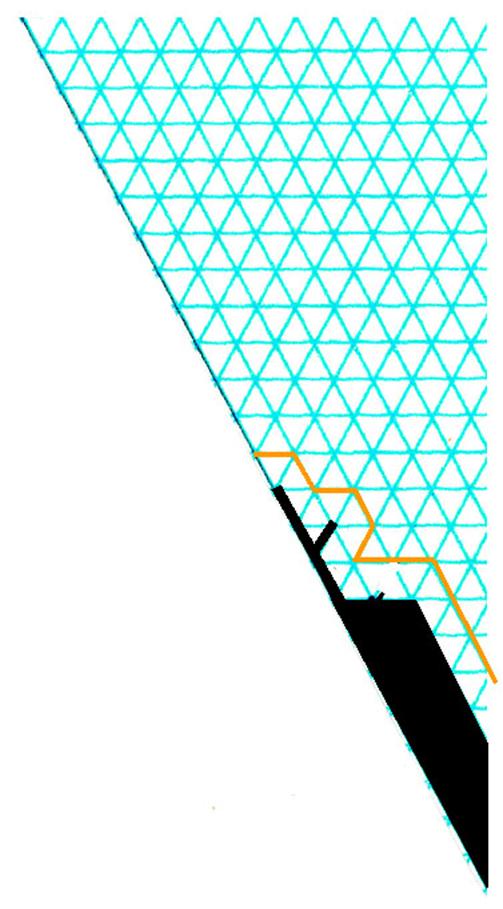
Fig. 19 Three growth modes
in simulation of snow crystal growth. (a) For pip 1 or 2, extend the tips,
(b) for pip 3 or 4,
extend tips and add side branches, (c) for pip 5 or 6, cover with one layer.
The process of simulation is given below (see
Fig. 19 also).
1) Draw an initial
crystal at the vertex of the section paper, as shown in Fig. 18.
2) Throw a die and
choose one of the three growth modes according to the pip of die:
Pip 1 or 2: extend the tip in its
direction.
Pip 3 or 4: extend the tip or the convex
corner in its direction and add two side
branches.
Pip 5 or 6: cover the crystal with one
layer.
3) When the main
axis (left end of the section paper) has grown to the top of the section
paper, stop the simulation, make photocopies and
complete the crystal shape.
Some results of simulation are shown in Fig. 20. Some students finished the artwork as
handmade (Fig. 20(a)), while others input the
results into a software for illustration (Fig. 20(b)). Fig. 20(c)
is a scene in an exhibition, where students made a large transparent panel on
which simulated snow crystals were pasted.
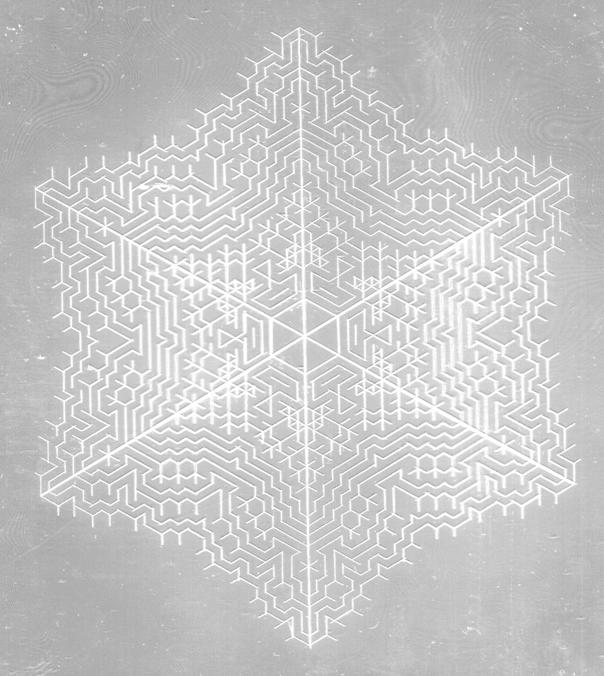
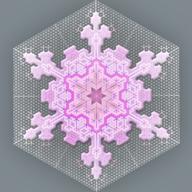
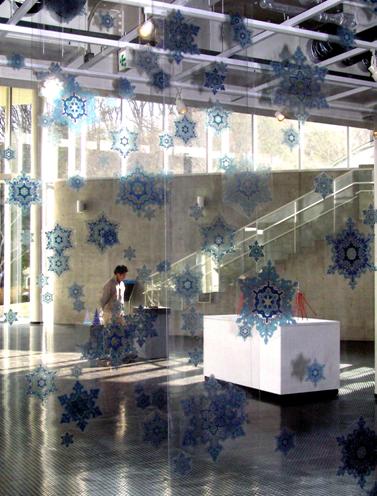
Fig. 20 Results of the simulation of snow
crystal growth. Snow crystals
(a) drawn by
scratching on a plastic plate by J.-S. Park, (b) drawn by a
software by W.-J. Li, (c) exhibited as a transparent
panel by J. Xu, D.-B.
G.-R. Li and M. Liu.
3. Concluding Remarks
Through the experience of the present author
since 2004 to manage this course he has come to have an impression that
students of art and design are originally very much interested in observing
natural phenomena and playing with mathematical games. They certainly enjoy
this course and seem to get stimulation for creative activities from
experiments of natural phenomena and exercises of geometrical structures. The
present author has also enjoyed observing their artworks created in this
course.
The outcome of this course lets this author
have an idea of strategy for effective interaction between science and art. If
a good system of education of this kind is established, students of art and
design would become familiar to scientific concepts and would try to apply them
to their artworks. It may open a new category of art, where science and art are
connected stronger than ever. Recently, application of modern media, such as
computer, laser, electric circuit, etc., has become popular among artists.
However, many of their activities seem to be just to make use of these media as
tools of creation and not to be based on scientific mind, which should be
associated with a motivation to get some finding in natural phenomena. This
motivation is considered to be necessary for interaction of science and art in
true sense. The present author believes that results of this course will give a
trigger to development of an educational system which enables this interaction.
He will be even happier, if students of science and technology begin creating
artworks based on their own scientific results.
A note is given here which is necessary in
managing this kind of courses. Students should have a certain degree of freedom
in the process of experiments and exercises, such as to fix precise
experimental procedures or to choose specimen for measurement. Thus, they are
encouraged to consider the processes scientifically and to go further beyond
subjective perception of the nature, which is expected to activate the desire
of creation.
At present, however, no reliable evidence is
available to show that this course has certainly given positive effects to
students. The present author has a confidence on it only through comments by
students, which were expressed in a questionnaire as written below.
*
Forms observed in the course, such as soap films and spirals, are attractive.
* We
can get stimulation for design from the topics of the course.
* We
can learn through playing.
*
Foreign students do not feel a wall of language.
* We
have realized that the art and design are common among the world.
Another good news
for this author is that one of students, Carlos A.M. Hoyos
who took this course in 2004, began constructing his own course in a
The present author considers that
communication and discussion are important among those who are interested in
developing a road to closer interaction between science and art. Therefore, he is
always ready to talk about various topics concerned to this problem.
Acknowledgement
The present author would like to express his
cordial thanks to Professor Slavik Jablan for inviting submission of this article. He also
thanks students of
References
Hoyos C. A. M., 2006, private communication through a preliminary report for doctor thesis.
Kobayashi, T., 1961, Phil. Mag., Vol. 6, 1363-1370.
Kuroda, T., 1984, The Crystal is Living, Saiensu-sha. [in Japanese]
Londenberg, K., 1972, Papier und Form, Scherpe Verlag Prefeld.
Nakaya, U., 1951, Compendium of Meteorol., Am. Meteorol. Soc.
Nakaya, U., 1954, Snow Crystals
- Natural and Artificial,
Schwabe, C. and Ishiguro, A., 2006, Geometric Art, Kousakusha Co. [in Japanese]
Takaki, R., 2004, 2005, 2006, Introduction to the theory of design,
(reports on the course),
Takaki, R., ed., 2003, Encyclopedia of Forms, Maruzen Co. [in Japanese]
Weaire, D.,
1996, The Kelvin Problem, Taylor
and Francis,
Weaire, D. and
Phelan, R.,1994, Philosophical Magazine Letters, 70,
345-350